百度 ueditor 一个编辑器实例,如何同时显示两个编辑区域?
![]() 微wx笑
微wx笑 2025-04-26【前端开发】
 0
0 0关键字:
百度 Ueditor 编辑器
百度 ueditor 一个编辑器实例,如何同时显示两个编辑区域?看看豆包给出的答案:<!DOCTYPE html><html><head> <meta charset="UTF-8"> <meta name="viewport" content="wid
百度 ueditor 一个编辑器实例,如何同时显示两个编辑区域?
看看豆包给出的答案:
<!DOCTYPE html>
<html>

<head>
    <meta charset="UTF-8">
    <meta name="viewport" content="width=device-width, initial-scale=1.0">
    <title>两个 UEditor 编辑区域</title>
    <!-- 引入 UEditor 的 CSS 文件 -->
    <link rel="stylesheet" href="ueditor/themes/default/css/ueditor.css">
</head>

<body>
    <!-- 第一个编辑区域的容器 -->
    <div id="editor1" style="width: 800px; height: 300px;"></div>
    <!-- 第二个编辑区域的容器 -->
    <div id="editor2" style="width: 800px; height: 300px;"></div>

    <!-- 引入 jQuery 库 -->
    <script src="https://code.jquery.com/jquery-3.6.0.min.js"></script>
    <!-- 引入 UEditor 的配置文件 -->
    <script src="ueditor/ueditor.config.js"></script>
    <!-- 引入 UEditor 的核心文件 -->
    <script src="ueditor/ueditor.all.min.js"></script>
    <script>
        // 初始化第一个编辑器实例
        var editor1 = UE.getEditor('editor1');
        // 初始化第二个编辑器实例
        var editor2 = UE.getEditor('editor2');
    </script>
</body>

</html>
它这个方案是搞两个编辑器的实例出来;
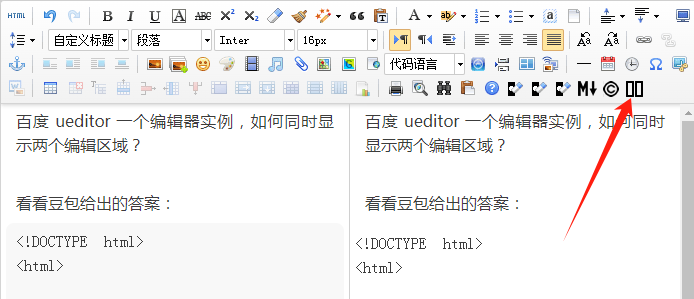
我要求的是一个编辑器实例,如何同时显示两个编辑区域,看来还得靠自己;
先看一下效果:

实现方法相关代码:
UE.registerUI('split_editor', function(editor, uiName) {
    editor.registerCommand(uiName, {
        execCommand: function() {
            var ueditor_0 = document.getElementById("ueditor_0");
            if (!ueditor_0){
            	console.log("split_editor 失败,document.getElementById(\"ueditor_0\") 为空");
                return false;
            }

            var ueditor_1 = document.getElementById("ueditor_1");
            if (ueditor_1){
              if (ueditor_1.style.display === "none"){
                  ueditor_0.width = "50%";
                  ueditor_1.style.display = "";
                  ueditor_1.width = "49.8%";
              }else{
                  ueditor_1.style.display = "none";
                  ueditor_0.width = "100%";
              }
            }else{
              ueditor_0.width = "50%";
              ueditor_1 = document.createElement("iframe");
              ueditor_1.id = "ueditor_1";
              ueditor_1.width = "49.8%";
              ueditor_1.height = "100%";
              ueditor_1.frameBorder = "0";
              ueditor_1.style.borderLeftWidth = "1px";
              ueditor_1.style.borderLeftColor = "#D0D0D0";
              ueditor_1.style.borderLeftStyle = "solid";
              ueditor_1.src = "javascript:void(function(){document.open();document.write(\"<!DOCTYPE html><html xmlns='http://www.w3.org/1999/xhtml' class='view'><head><style type='text/css'>.view{padding:0;word-wrap:break-word;cursor:text;height:90%;} body{margin:8px;font-family:sans-serif;font-size:16px;}p{margin:5px 0;}</style><link rel='stylesheet' type='text/css' href='https://ivu4e.cn/e/extend/ueditor/themes/iframe.css'/></head><body class='view' contenteditable='true'></body><script type='text/javascript' id='_initialScript'>setTimeout(function(){editor = window.parent.UE.instants['ueditorInstant0'];document.body.innerHTML = editor.getContent();},0);var _tmpScript = document.getElementById('_initialScript');_tmpScript.parentNode.removeChild(_tmpScript);</script></html>\");document.close();}())";
              document.getElementById("edui1_iframeholder").append(ueditor_1);
            }
        }
    });
    var btn = new UE.ui.Button({
        name: uiName,
        title: "将编辑区域一分为二",
        cssRules: 'background-position: -840px -76px;',
        onclick: function() {
            editor.execCommand(uiName);
        }
    });
    editor.addListener('selectionchange', function() {
        var state = editor.queryCommandState(uiName);
        if (state == -1) {
            btn.setDisabled(true);
            btn.setChecked(false);
        } else {
            btn.setDisabled(false);
            btn.setChecked(state);
        }
    });
    return btn;
});
在ueditor目录下的customize.js文件中添加以上代码;
没有 customize.js 文件创建一个就可以;
然后在引用 ueditor.all.js 的之后添加对 customize.js 文件的引用;
图片的话在已经有的 icons.png 就可以;
本文由 微wx笑 创作,采用 署名-非商业性使用-相同方式共享 4.0 许可协议,转载请附上原文出处链接及本声明。
原文链接:https://www.ivu4e.cn/blog/front/2025-04-26/2062.html
上一篇:Chrome扩展background.js访问剪贴板指南
下一篇:返回列表


