2020微信支付v3版本java对接详细流程
![]() 微wx笑
微wx笑 2021-08-25【微信支付】
 8
8 0关键字:
微信支付 java
0关键字:
微信支付 java
都0202年,我似乎翻遍了百度,都没找到最新版微信支付v3的对接相关的详细博客,我都纳闷了,只有自己摸索。还有就是竟然还有人用一些v3对接的假代码,来骗积分,我真的服了,感同身受,以下是我对接的过程,分享给大家,欢迎小伙伴一起探讨。
~首先吐槽下腾讯的文档,自己根据文档看,对于没有对接经验的来说,根本看不懂,什么乱起八糟的,心里一万个草泥马。
其次,特别是对接的数据加密解密,传递格式那些是最让人想疯的东西。所以已经有大佬把这些基础的数据对接做了整合,就在gitee上,ijPay。ijPay我们只需要关注的只有给对象设置参数,发起请求,处理响应数据,就完事,很方便。此篇文章就基于此展开对接的讲解。
此篇博客大体内容:
1.ijPay 配置配置文件的讲解
2.公众号和商户平台配置的讲解
3.本地直接测试对接微信支付的方式
4.微信支付v3版nativePay
5.微信支付v3版jsApiPay
6.微信支付v3版h5Pay
7.微信支付通用退订
8.微信支付通用退订查询
8.附前后端直接copy的代码
1.gitee开源支付对接源码(ijpay)地址
2.ijpay官方文档地址
![]() 我的对接代码下载
我的对接代码下载
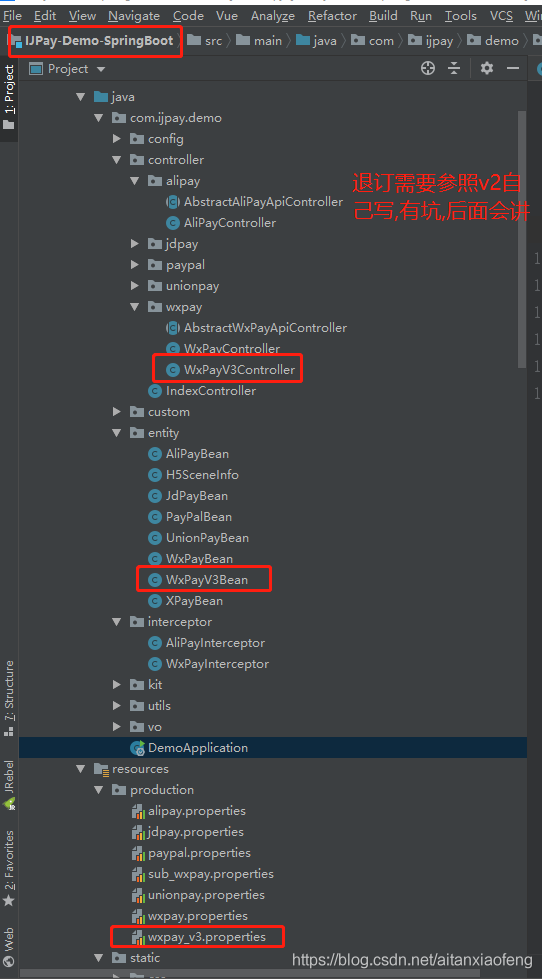
ps:ijpay中可以自己读代码,再根据腾讯的文档,摸索(ijpay注释较少,v3的退订使用的v2的退定接口,v3没有提供对应的代码,自己需要参照v2,并且退订参照有坑,后面会说).也可以花钱让ijpay的作者给你在线帮助
整体对接流程概括如下
肯定是先下载ijpay源码到本地
ijpay整合了许多支付,这里我们只讲解微信支付v3的对接,那么我自己是另外新建了一个springboot项目,然后把源码里面的微信v3支付的代码拷贝到新项目里面做测试的,缺什么依赖,根据报红的提示,自己引入,这里不做详细说明.
pom.xml
<?xml version="1.0" encoding="UTF-8"?>
<project xmlns="http://maven.apache.org/POM/4.0.0" xmlns:xsi="http://www.w3.org/2001/XMLSchema-instance"
         xsi:schemaLocation="http://maven.apache.org/POM/4.0.0 https://maven.apache.org/xsd/maven-4.0.0.xsd">
    <modelVersion>4.0.0</modelVersion>
    <parent>
        <groupId>org.springframework.boot</groupId>
        <artifactId>spring-boot-starter-parent</artifactId>
        <version>2.3.3.RELEASE</version>
        <relativePath/> <!-- lookup parent from repository -->
    </parent>
    <groupId>com.example</groupId>
    <artifactId>wxpay</artifactId>
    <version>0.0.1-SNAPSHOT</version>
    <name>wxpay</name>
    <description>Demo project for Spring Boot</description>
    <packaging>war</packaging>

    <properties>
        <project.build.sourceEncoding>UTF-8</project.build.sourceEncoding>
        <project.reporting.outputEncoding>UTF-8</project.reporting.outputEncoding>
        <java.version>1.8</java.version>
        <ijapy.version>2.7.0</ijapy.version>
        <enjoy.version>4.3</enjoy.version>
    </properties>

    <dependencies>
        <dependency>
            <groupId>org.slf4j</groupId>
            <artifactId>slf4j-api</artifactId>
            <version>${slf4j.version}</version>
            <scope>compile</scope>
        </dependency>
        <dependency>
            <groupId>ch.qos.logback</groupId>
            <artifactId>logback-core</artifactId>
            <version>1.1.7</version>
        </dependency>
        <dependency>
            <groupId>ch.qos.logback</groupId>
            <artifactId>logback-classic</artifactId>
            <version>1.2.3</version>
        </dependency>
        <!--添加servlet-api的依赖,用来打war包  -->
        <dependency>
            <groupId>javax.servlet</groupId>
            <artifactId>javax.servlet-api</artifactId>
            <scope>provided</scope>
        </dependency>
        <!--最终打成war包,排除内置的tomcat-->
        <dependency>
            <groupId>org.springframework.boot</groupId>
            <artifactId>spring-boot-starter-web</artifactId>
            <exclusions>
                <exclusion>
                    <groupId>org.springframework.boot</groupId>
                    <artifactId>spring-boot-starter-tomcat</artifactId>
                </exclusion>
            </exclusions>
        </dependency>
        <dependency>
            <groupId>org.springframework.boot</groupId>
            <artifactId>spring-boot-starter-web</artifactId>
        </dependency>
        <dependency>
            <groupId>org.apache.commons</groupId>
            <artifactId>commons-lang3</artifactId>
            <version>3.9</version>
        </dependency>
        <dependency>
            <groupId>com.github.javen205</groupId>
            <artifactId>IJPay-All</artifactId>
            <version>${ijapy.version}</version>
        </dependency>
        <dependency>
            <groupId>com.github.xkzhangsan</groupId>
            <artifactId>xk-time</artifactId>
            <version>2.1.0</version>
        </dependency>
        <dependency>
            <groupId>org.springframework.boot</groupId>
            <artifactId>spring-boot-starter-test</artifactId>
            <scope>test</scope>
            <exclusions>
                <exclusion>
                    <groupId>org.junit.vintage</groupId>
                    <artifactId>junit-vintage-engine</artifactId>
                </exclusion>
            </exclusions>
        </dependency>
        <!-- https://mvnrepository.com/artifact/com.alipay.sdk/alipay-sdk-java -->
        <dependency>
            <groupId>com.alipay.sdk</groupId>
            <artifactId>alipay-sdk-java</artifactId>
            <version>4.7.11.ALL</version>
        </dependency>
        <dependency>
            <groupId>org.springframework.boot</groupId>
            <artifactId>spring-boot-configuration-processor</artifactId>
            <optional>true</optional>
        </dependency>
    </dependencies>

    <build>
        <resources>
            <resource>
                <directory>src/main/resources</directory>
            </resource>
            <resource>
                <directory>src/main/resources/${profiles.active}</directory>
            </resource>
        </resources>
        <plugins>
            <plugin>
                <groupId>org.springframework.boot</groupId>
                <artifactId>spring-boot-maven-plugin</artifactId>
                <configuration>
                    <fork>true</fork>
                </configuration>
            </plugin>
        </plugins>
    </build>
    <profiles>
        <!-- 默认激活 dev 开发环境 -->
        <!-- production使用 mvn xxx -Pproduction -->
        <profile>
            <!-- 本地开发环境 -->
            <id>development</id>
            <properties>
                <profiles.active>dev</profiles.active>
            </properties>
            <activation>
                <activeByDefault>true</activeByDefault>
            </activation>
        </profile>
        <profile>
            <!-- 生产环境 -->
            <id>production</id>
            <properties>
                <profiles.active>production</profiles.active>
            </properties>
        </profile>
    </profiles>

</project>
2.【 微信支付v3版本证书下载】和【配置配置文件】
这里先说下公众号和商户平台的关系,公众号的支付依附于商户平台,所以公众号和商户平台要做关联处理:
登陆商户平台–>产品中心–>AppID账号管理
关联过程,自行百度咯,不做过多讲解
1).证书的下载
登陆商户平台–>账户中心–>api安全–>API安全
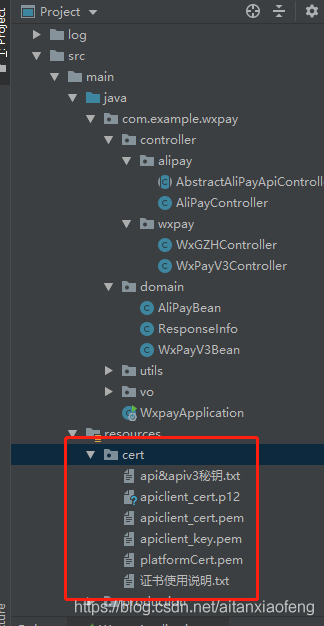
然后生成证书,最终会生成3个文件生成流程:
自行查看官方文档

2).证书copy到【新项目】的文件夹中
我这边是放在了src\main\resources\cert目录下
3).设置api秘钥和apiv3秘钥
登陆商户平台–>账户中心–>api安全–>设置api秘钥/设置apiv3秘钥
保存好,后面要用到
4).设置配置文件 wxpay_v3.properties
为了方便你们copy
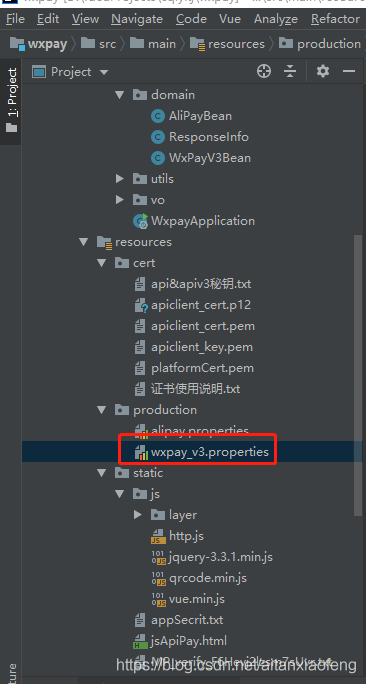
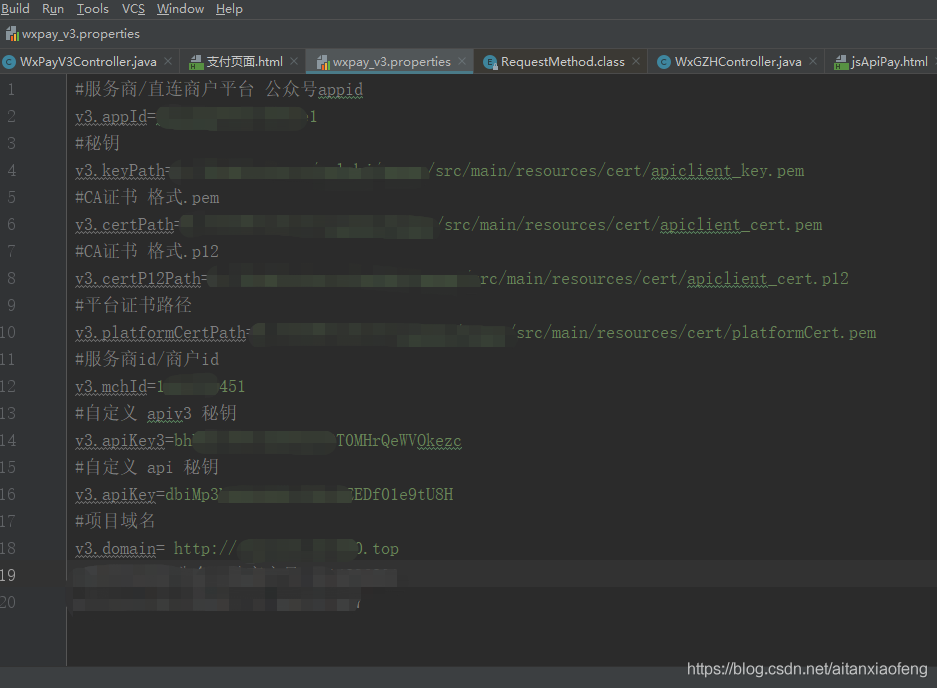
#服务商/直连商户平台 关联的 公众号appid
v3.appId=?
#秘钥
v3.keyPath=?
#CA证书 格式.pem
v3.certPath=?
#CA证书 格式.p12
v3.certP12Path=?(退订的时候用的这个!!!)
#平台证书路径
v3.platformCertPath=?
#服务商id/商户id
v3.mchId=?
#自定义 apiv3 秘钥
v3.apiKey3=?
#自定义 api 秘钥
v3.apiKey=只用于退订的时候(退订的时候用的v2的接口)
#项目域名
v3.domain=?
ps:这里讲下配置文件的参数如果获取
appId:登陆微信公众平台–>开发–>基本配置–>开发者ID(AppID)
keyPath: 对应apiclient_key.pem所在路径
certPath: 对应apiclient_cert.pem所在路径
certP12Path: 对应apiclient_cert.p12所在路径(退订的时候用的这个!!!)
platformCertPath: 【平台证书】访问v3支付提供的接口获取,下面会讲
mchId: 登陆商户平台–>账户中心–>商户信息–>微信支付商户号
apiKey3: 参考上面的设置api秘钥和apiv3秘钥
apiKey: 参考上面的设置api秘钥和apiv3秘钥
domain: 项目域名
关于项目域名,我这边用的natapp做的本地内网映射,可以直接在本地做支付测试,因为natapp代理的域名都是备案了的,非常方便,这里推荐下,不然去服务器上测试,太麻烦了.
natapp官方链接地址 自己看natapp的文档或者帮助,这里不做过多讲解
5).获取平台证书,也就是上图的platformCert.pem文件
启动服务,本地访问接口: localhost/v3/get
这里会请求腾讯接口,拿到平台证书,并保存到配置文件所配置的路径下(注意文件名在配置文件一开始就要配好)
配置文件到这里就配好了
支付对接(直连商户模式)
ps:v3微信支付官方文档
基础支付–>【直连模式】和【服务商模式】的区别?
1.接口对接的角度来说,就访问的地址不同,和传递的参数有差别,实现的效果是一样的,响应的参数的处理方式是一样的
2.从现实逻辑来讲,
直连模式是公众号直接对接商户平台,发起支付,
关系为: 公众号–>商户平台
服务商模式是基于直连,商户平台又把支付授权给服务商,
关系为: 公众号–>商户平台–>服务商
用服务商模式,貌似有返点啥的,没有深入研究,有兴趣自行百度,两者对接方式差不多,只是传递的参数有些许差别.但相应参数的处理是一样的,此篇博客只讲直连方式,服务商模式可以自行举一反三.
![]() 一.电脑生成二维码,手机扫码支付(nativePay)
一.电脑生成二维码,手机扫码支付(nativePay)
用大佬的写好的代码,根本不用关心什么加密解密什么的,配置文件配好,调接口就完事了QAQ
不同的支付的应用场景:
1.nativePay(电脑生成二维码,手机扫码支付)
1.jsApiPay(微信自带浏览器中或者说公众号里面,唤起微信支付)
1.h5Pay(手机普通浏览器中,唤起微信支付)
注意:
1.传递参数根据官方文档来看,ijpay源码可能在服务商和直连商户两种模式的代码只提供了其一,灵活斟酌
2.登陆商户平台–>产品中心–>我的产品–>开通nativePay
其它的支付看需要开通,具体操作,百度啊QAQ,后面就不提示开通支付这个事情了,自己可以先提前开通了都,h5pay开通需要审核,并且注意第一个域名没有限制,第二个域名必须填写商户备案的域名,自行查看商户信息对应的域名是啥,复制粘贴
大概流程:
请求iJPay接口,拿到二维码生成链接–>用生成二维码的js,生成支付码–>扫码支付
官方文档: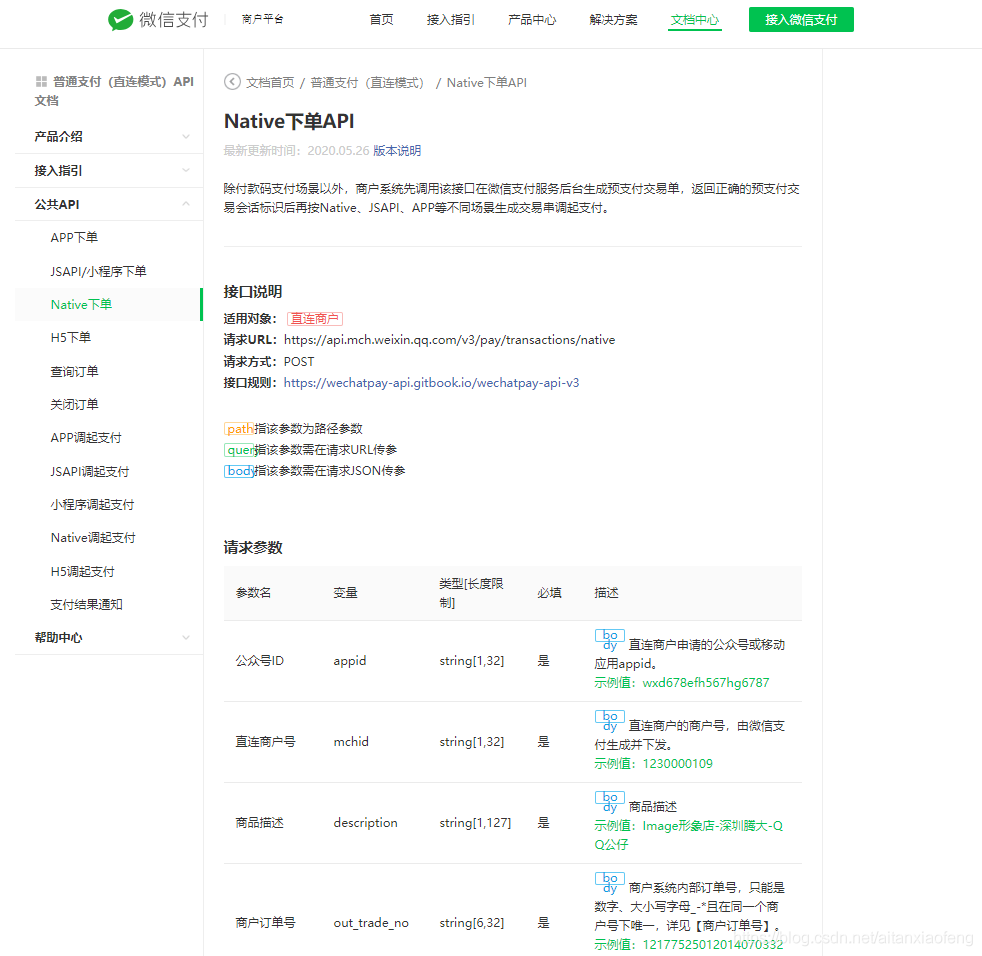
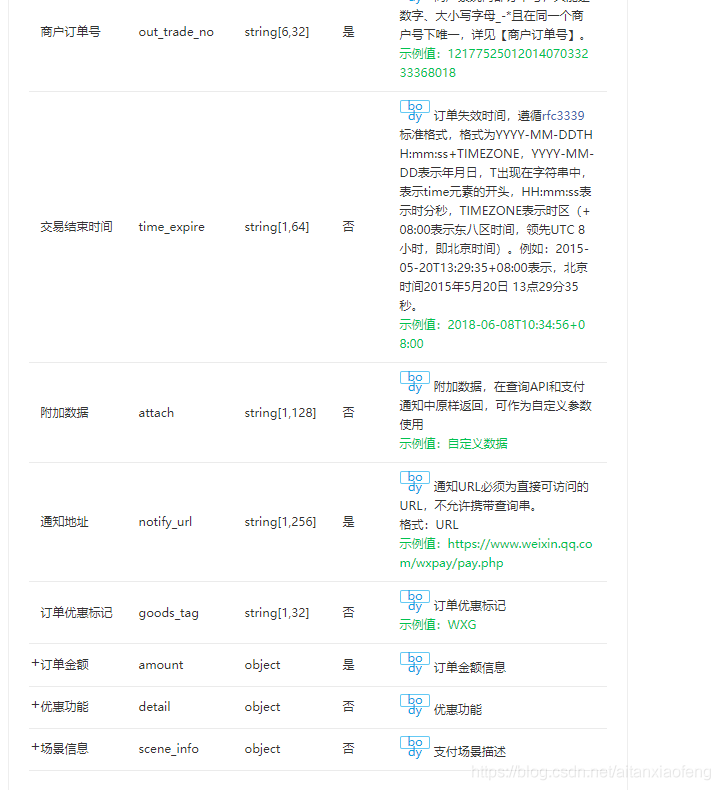
响应参数示例
{
"code_url": "weixin://wxpay/bizpayurl/up?pr=NwY5Mz9&groupid=00"
}123
1).发起支付请求,获取二维码链接地址
请求接口(com.example.wxpay.controller.wxpay.WxPayV3Controller#nativePay):
http://localhost/v3/nativePay1
2).响应参数
{
"code_url": "weixin://wxpay/bizpayurl/up?pr=NwY5Mz9&groupid=00"
}123
3).生成二维码(qrcode.min.js)
<!DOCTYPE html PUBLIC "-//W3C//DTD XHTML 1.0 Transitional//EN" "http://www.w3.org/TR/xhtml1/DTD/xhtml1-transitional.dtd">
<html xmlns="http://www.w3.org/1999/xhtml" xml:lang="ko">
<head>
    <title>Javascript 二维码生成库:QRCode</title>
    <meta http-equiv="Content-Type" content="text/html; charset=UTF-8" />
    <meta name="viewport" content="width=device-width,initial-scale=1,user-scalable=no" />
    <script type="text/javascript" src="//cdn.staticfile.org/jquery/2.1.1/jquery.min.js"></script>
    <script type="text/javascript" src="//static.runoob.com/assets/qrcode/qrcode.min.js"></script>
</head>
<body>
<input id="text" type="text" value="http://www.runoob.com" style="width:80%" /><br />
<div id="qrcode" style="width:100px; height:100px; margin-top:15px;"></div>

<script type="text/javascript">
    var qrcode = new QRCode(document.getElementById("qrcode"), {
        width : 100,
        height : 100
    });

    function makeCode () {
        var elText = document.getElementById("text");

        if (!elText.value) {
            alert("Input a text");
            elText.focus();
            return;
        }

        qrcode.makeCode(elText.value);
    }

    makeCode();

    $("#text").
    on("blur", function () {
        makeCode();
    }).
    on("keydown", function (e) {
        if (e.keyCode == 13) {
            makeCode();
        }
    });
</script>
</body>
</html>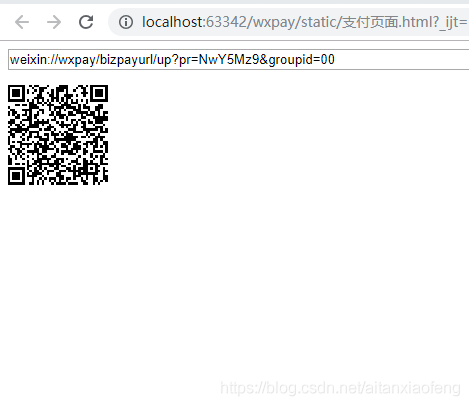
支付成功后会有一个回调通知,在一开始传递的参数里面
ijpay里面也是写好了的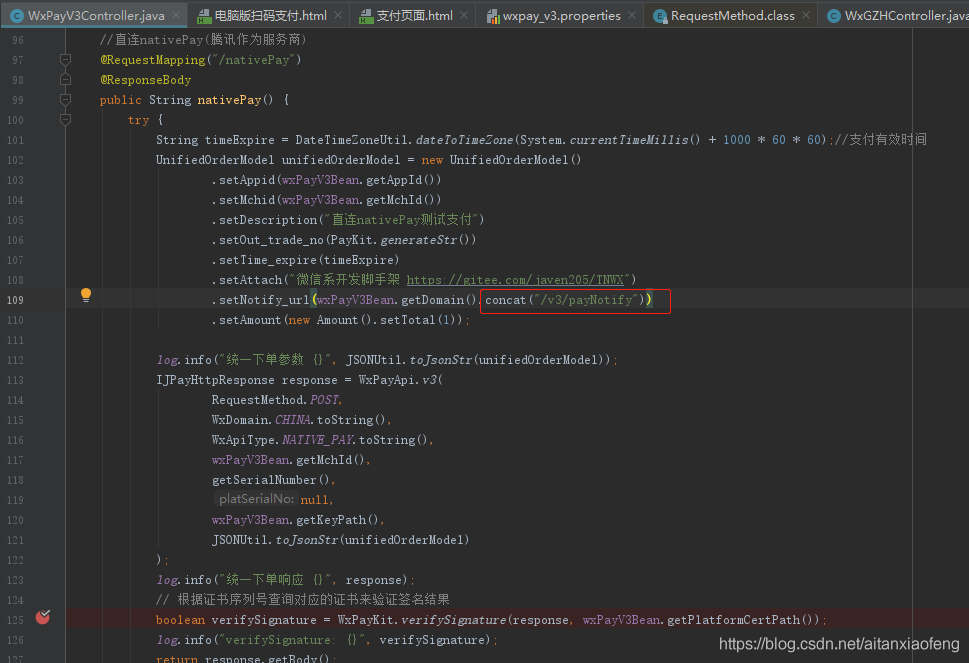
通知的对接自行看ijpay打印的参数,做自己的逻辑处理
com.example.wxpay.controller.wxpay.WxPayV3Controller#payNotify
![]() 二.微信自带浏览器中或者说公众号里面,唤起微信支付(jsApiPay)
二.微信自带浏览器中或者说公众号里面,唤起微信支付(jsApiPay)
注意:
配置jsApiPay的支付目录,我配置的 本地映射的代理域名+’/’
登陆直连商户平台–>产品中心–>开发配置–>支付配置–>JSAPI支付
大概流程:
拿到微信用户的openId–>调用ijpay接口(传入openId)–>响应 唤起微信支付的json数据–>基于响应json,前端js二次请求腾讯接口–>唤起支付
官方文档(jsApiPay下单)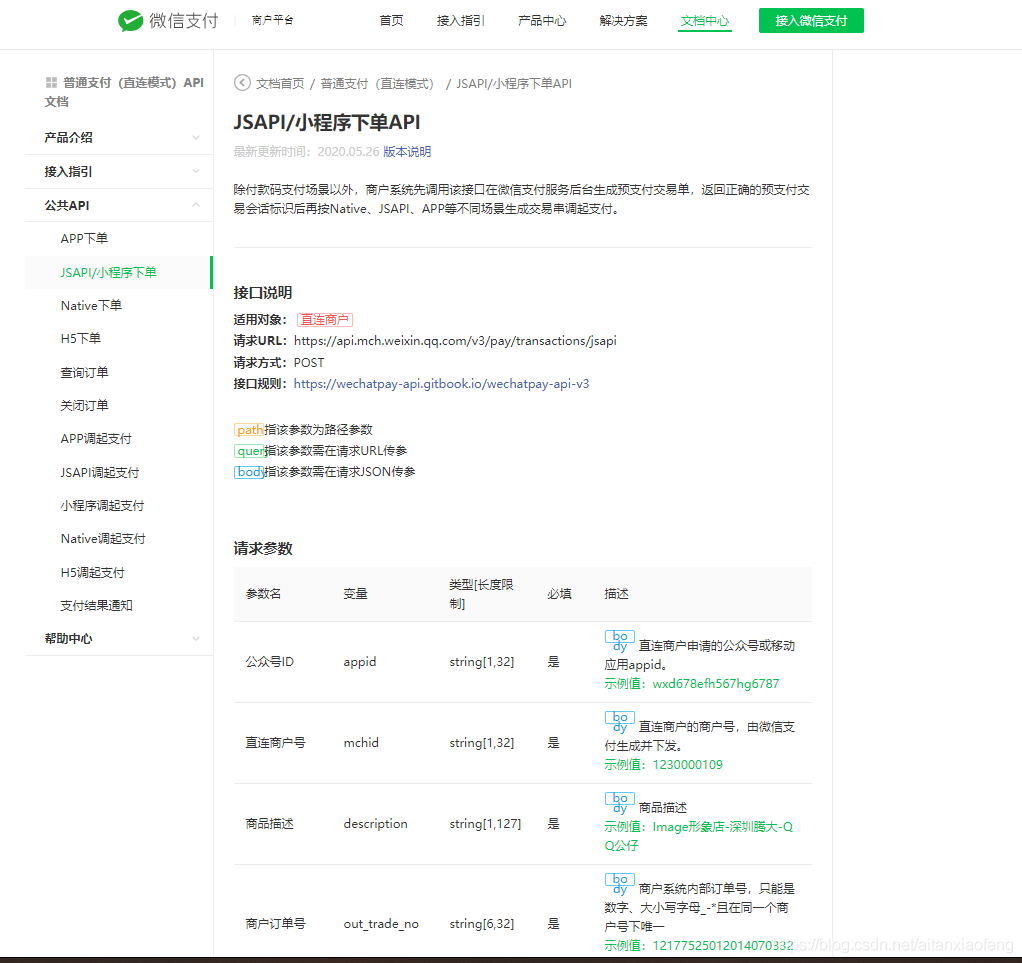
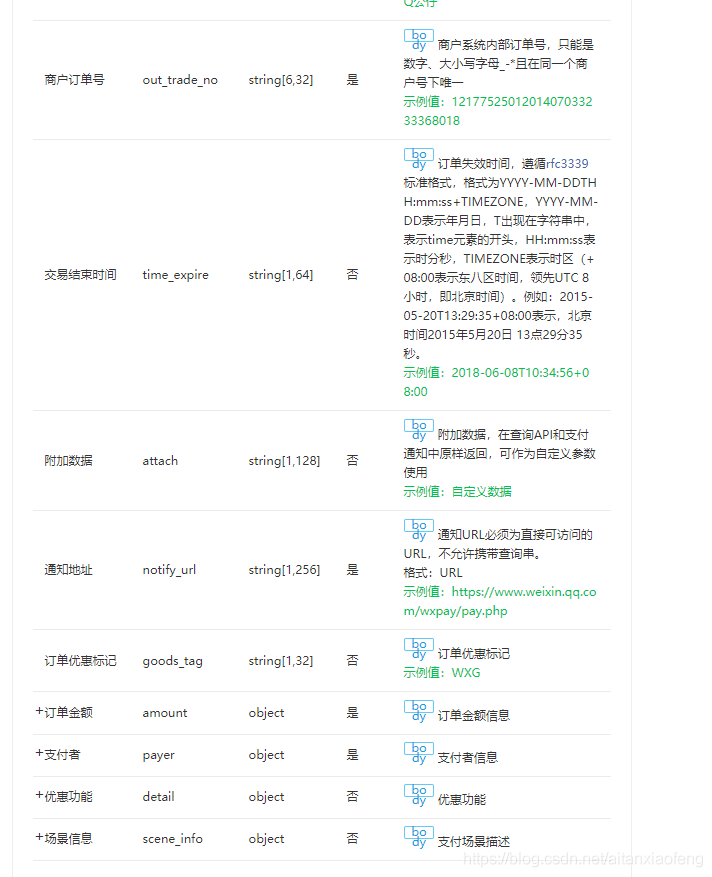
官方文档(jsApiPay唤起支付)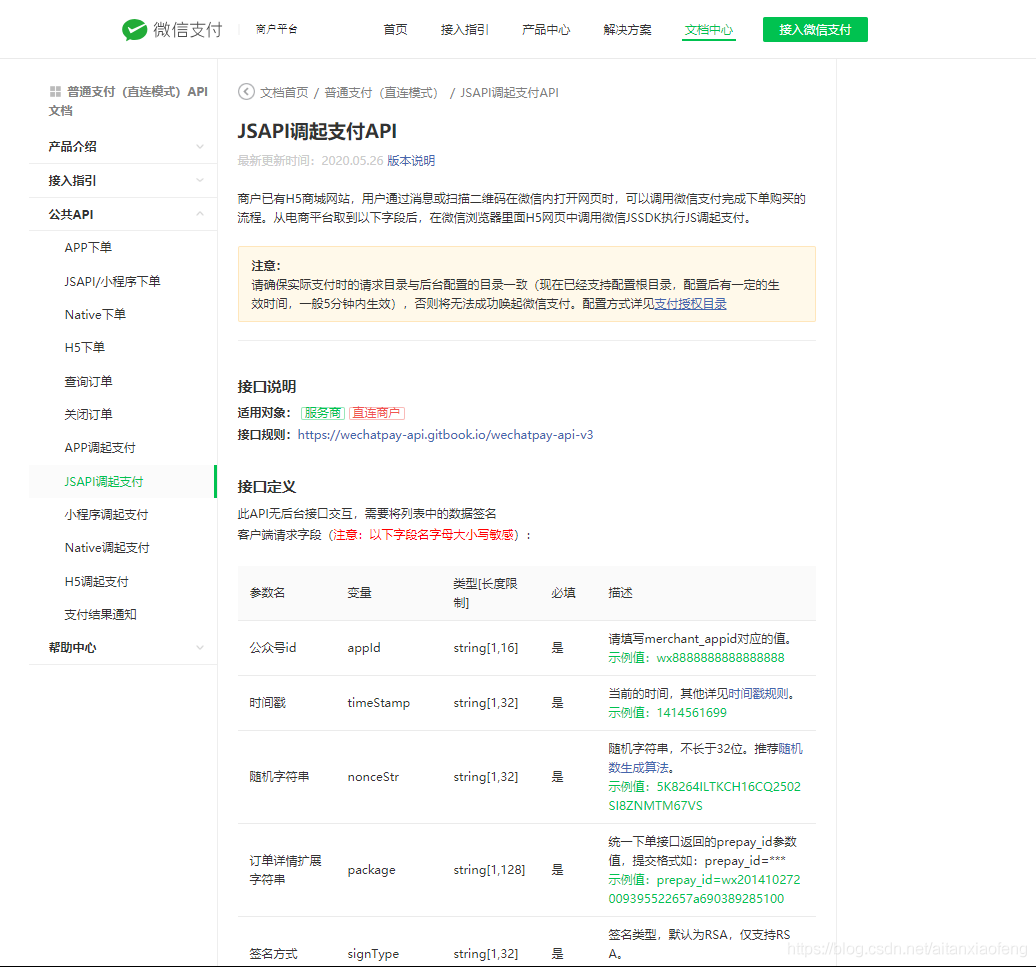
1).拿到微信用户的openId
参考自博客:java-微信公众号菜单跳转网页获取openid
就拿openId这一步就挺麻烦
大概流程:
公众号菜单点击–>自定义请求接口1(请求腾讯拿到code)–>重定向自到定义接口2(根据code请求腾讯拿到openId)–>重定向到自定义html页面,拿到微信用户openId,初始化调用上述接口…(你也可以在网页里面发起ajax请求,这里做测试,主要是对接成功,自己灵活应用.)
直接上自定义接口的代码
WxGZHController.java
package com.example.wxpay.controller.wxpay;

import com.alibaba.fastjson.JSONObject;
import com.example.wxpay.domain.WxPayV3Bean;
import com.ijpay.core.kit.HttpKit;
import org.slf4j.Logger;
import org.slf4j.LoggerFactory;
import org.springframework.stereotype.Controller;
import org.springframework.web.bind.annotation.RequestMapping;
import org.springframework.web.bind.annotation.RequestParam;
import javax.annotation.Resource;

/**
 * @ClassName WxGZHController
 * 微信公众号对接
 * @Author ZhangYong
 * @Date 2020/11/10 15:46
 * @Version 1.0
 **/
@RequestMapping("/wxgzh")
@Controller
public class WxGZHController {

    private static final Logger log = LoggerFactory.getLogger(WxGZHController.class);

    @Resource
    WxPayV3Bean wxPayV3Bean;

    private static final String serverSuffixUrl = "/wxgzh/weixinoauth";//查询到code后重定向的目录
    private static final String stateCashout = "cashOut";
    private static final String weixinGzhSecret = "785yuiyddsc76f115cd3fa86746";//开发者密码(AppSecret)
    private static final String jsApiPayUrl = "/jsApiPay.html";//使用openId的html页面


    /*获取微信浏览器用户openId,并跳转页面传递openId*/
    //1.先查询code
    @RequestMapping("/redirecttocashout")
    public String redirectToCashout() {
        log.info("准备获取code");
        return "redirect:https://open.weixin.qq.com/connect/oauth2/authorize?appid="
                + wxPayV3Bean.getAppId() + "&redirect_uri=" + wxPayV3Bean.getDomain()
                +"/"+serverSuffixUrl+"?response_type=code&scope=snsapi_base&state=" + stateCashout + "#wechat_redirect";
    }

    //2.根据code获取openId
    @RequestMapping("/weixinoauth")
    public String weixinOauth(@RequestParam String code,@RequestParam String state) throws Exception {
        log.info("获取code:{}",code);
        String url = "https://api.weixin.qq.com/sns/oauth2/access_token?appid="
                + wxPayV3Bean.getAppId() + "&secret=" + weixinGzhSecret + "&code=" + code + "&grant_type=authorization_code";
        String res = HttpKit.getDelegate().get(url, null);
        System.out.println(res);
        String openid = JSONObject.parseObject(res).getString("openid");
        log.info("根据code查询得到openId:{}",openid);
        String redirect = "";
        switch (state){
            case stateCashout:
                redirect =jsApiPayUrl + "?openId=" + openid;
                break;
        }
        log.info("准备调起jsApi支付,url:{}",redirect);
        return "redirect:" + redirect;//重定向到jsApiPay.html并传递openId
    }


}
jsApiPay.html
<!DOCTYPE html>
<html>
<head>
<meta charset="UTF-8">
<title>jsApi支付测试</title>
<script src="https://cdn.staticfile.org/vue/2.2.2/vue.min.js"></script>
<script src="https://cdn.staticfile.org/jquery/1.10.2/jquery.min.js"></script>
<script src="./js/http.js"></script>
</head>
<body>
<script>
new Vue({
el:'app',
data(){
return {
callPayParam:{
appId:'',
timeStamp:'',
nonceStr:'',
package:'',
signType:'RSA',
paySign:'',
}
}
},
methods:{
prePay(openId){
http.get('/v3/jsApiPay?openId='+openId,{},res=>{
console.log(res)
//alert(res)
this.callPayParam = JSON.parse(res)
this.onBridgeReady()//唤起支付
})
},
onBridgeReady() {
alert(this.callPayParam)
alert(this.callPayParam.appId)
WeixinJSBridge.invoke('getBrandWCPayRequest', {
"appId": this.callPayParam.appId,//公众号名称,由商户传入
"timeStamp": this.callPayParam.timeStamp,//时间戳,自1970年以来的秒数
"nonceStr": this.callPayParam.nonceStr,//随机串
"package": this.callPayParam.package,//预支付返回数据
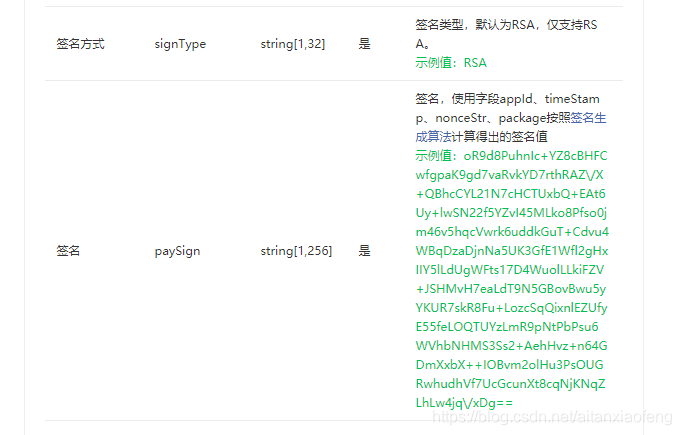
"signType": this.callPayParam.signType,//微信签名方式:
"paySign":this.callPayParam.paySign //微信签名
},
function(res) {
if (res.err_msg == "get_brand_wcpay_request:ok") {
// 使用以上方式判断前端返回,微信团队郑重提示:
//res.err_msg将在用户支付成功后返回ok,但并不保证它绝对可靠。
}
});
}
},
mounted() {
let openId = getQueryVariable('openId')
console.log('openId:'+openId)
this.prePay(openId)
}
})
function onBridgeReady() {
WeixinJSBridge.invoke('getBrandWCPayRequest', {
"appId": "wx2421b1c4370ec43b",
//公众号名称,由商户传入
"timeStamp": "1395712654",
//时间戳,自1970年以来的秒数
"nonceStr": "e61463f8efa94090b1f366cccfbbb444",
//随机串
"package": "prepay_id=up_wx21201855730335ac86f8c43d1889123400",
"signType": "RSA",
//微信签名方式:
"paySign": "oR9d8PuhnIc+YZ8cBHFCwfgpaK9gd7vaRvkYD7rthRAZ\/X+QBhcCYL21N7cHCTUxbQ+EAt6Uy+lwSN22f5YZvI45MLko8Pfso0jm46v5hqcVwrk6uddkGuT+Cdvu4WBqDzaDjnNa5UK3GfE1Wfl2gHxIIY5lLdUgWFts17D4WuolLLkiFZV+JSHMvH7eaLdT9N5GBovBwu5yYKUR7skR8Fu+LozcSqQixnlEZUfyE55feLOQTUYzLmR9pNtPbPsu6WVhbNHMS3Ss2+AehHvz+n64GDmXxbX++IOBvm2olHu3PsOUGRwhudhVf7UcGcunXt8cqNjKNqZLhLw4jq\/xDg==" //微信签名
},
function(res) {
if (res.err_msg == "get_brand_wcpay_request:ok") {
// 使用以上方式判断前端返回,微信团队郑重提示:
//res.err_msg将在用户支付成功后返回ok,但并不保证它绝对可靠。
}
});
}
</script>
</body>
</html>公众号菜单配置
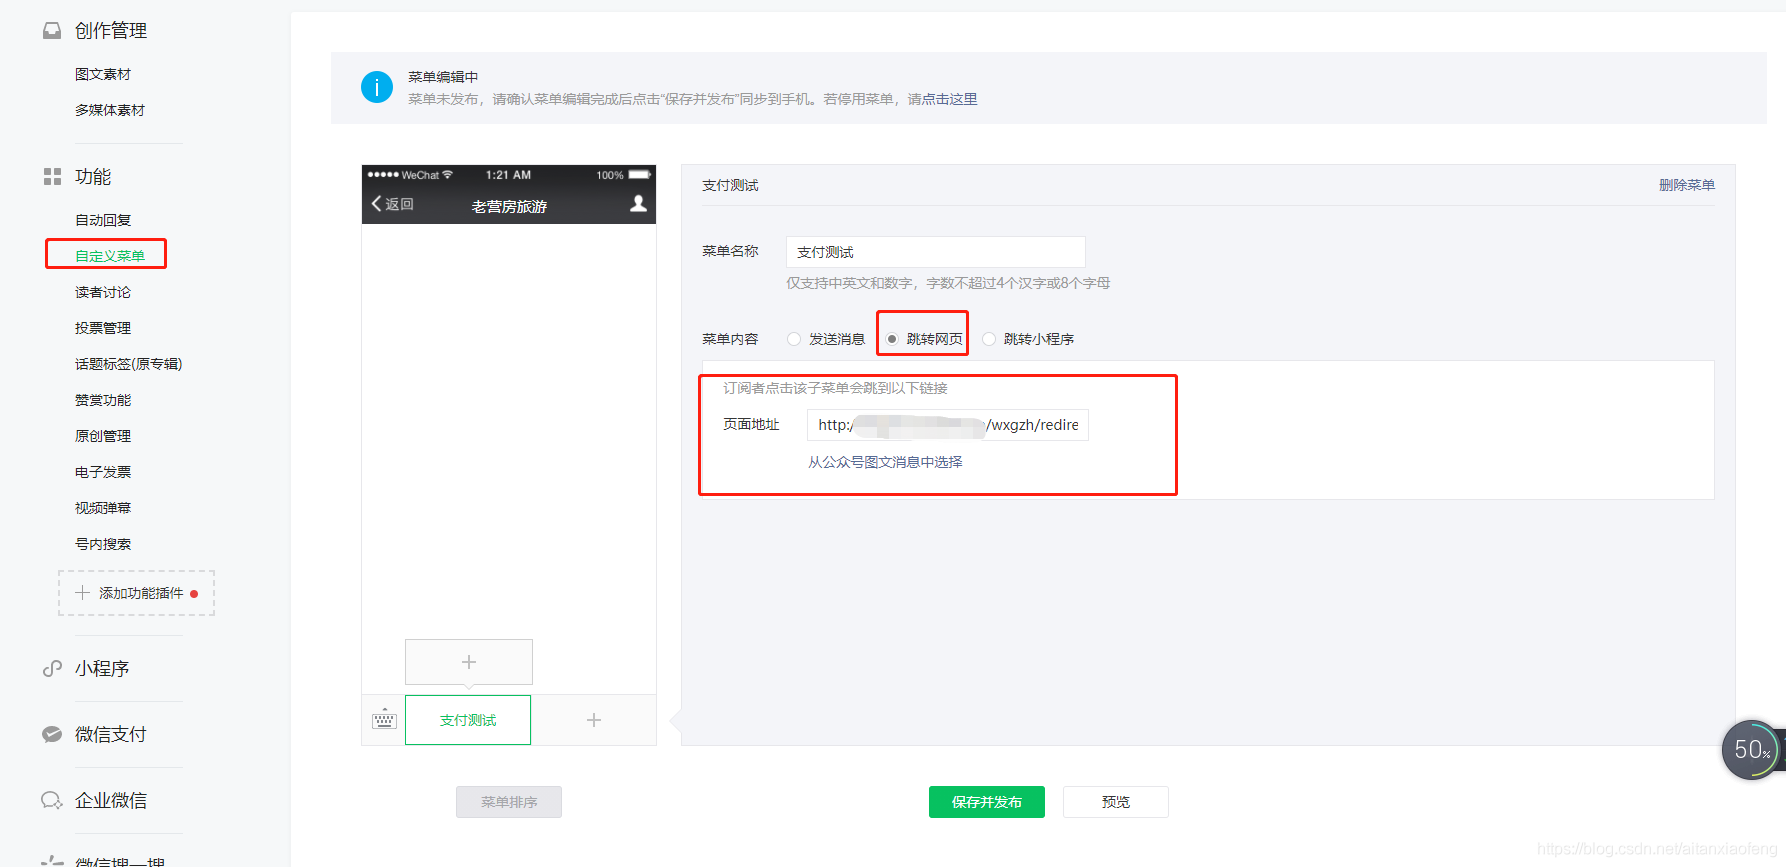
请求的接口为
http://域名/wxgzh/redirecttocashout
对应控制器:com.example.wxpay.controller.wxpay.WxGZHController#redirectToCashout
开发者密码(AppSecret)
公众号后台–>开发–>基本配置–>开发者密码(AppSecret)
公众号网页授权设置
参考上述的参考博客↑↑
通知处理同上
![]() 三.手机普通浏览器,唤起微信支付(h5Pay)
三.手机普通浏览器,唤起微信支付(h5Pay)
注意:
貌似iJPay源码只提供了服务商模式,自行修改传递的参数,和请求的api接口地址
貌似在本地也能做测试,并不是必须在商户备案了的域名下才行
大概流程:
请求iJPay接口–>请求腾讯接口–>响应 唤起支付的url地址–>重定向或者前端跳转url–>唤起微信支付
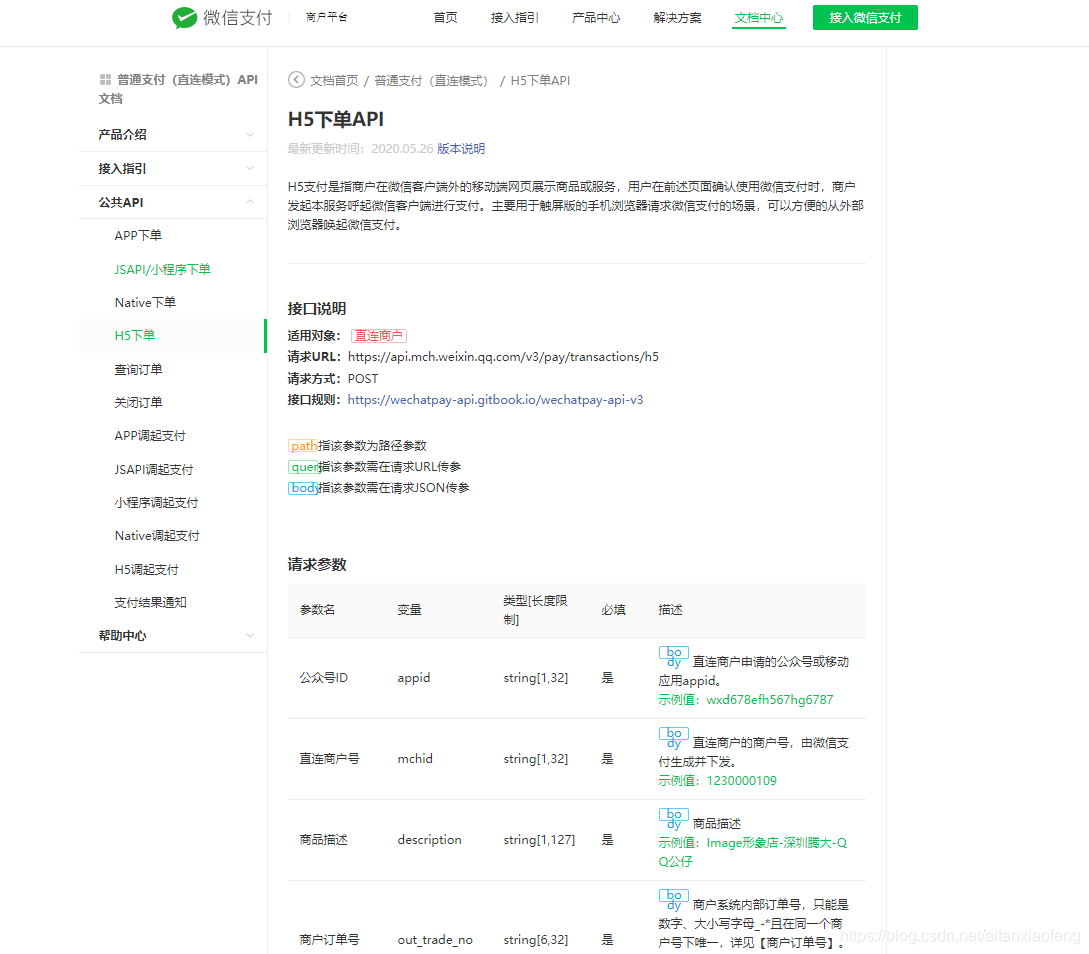

官方文档(h5Pay唤起支付)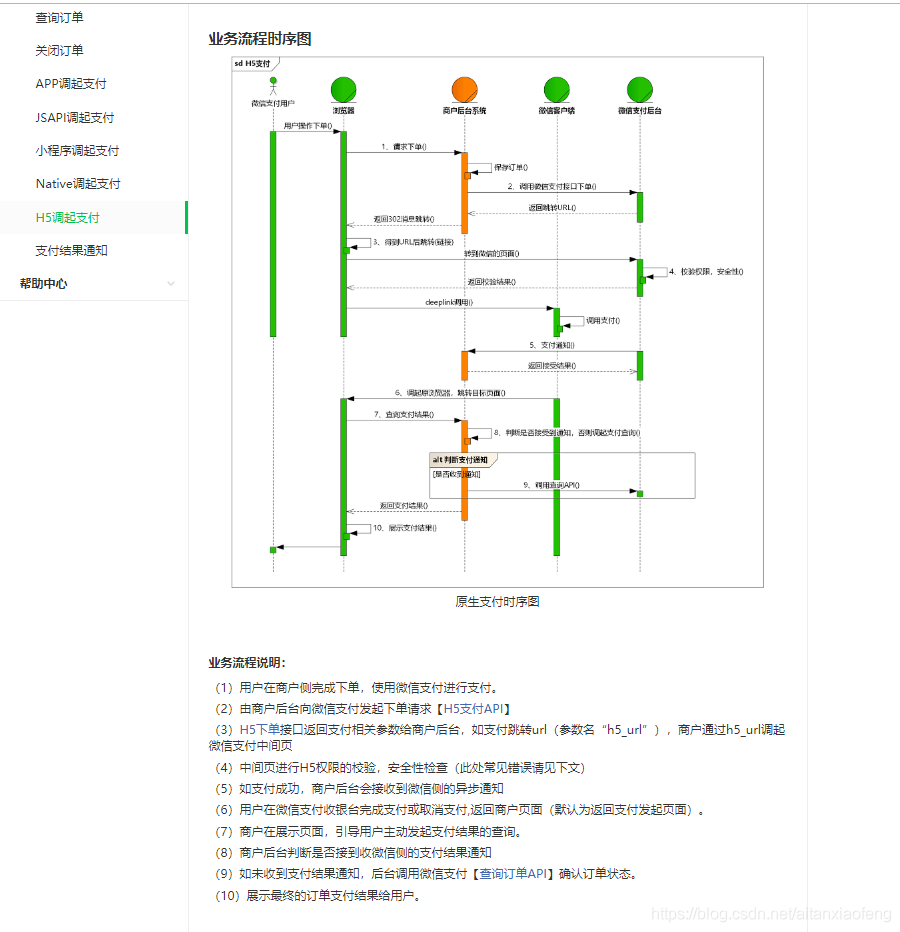
直接上代码,不多bb
微信h5支付.html
<!DOCTYPE html>
<html>
<head>
    <meta charset="UTF-8">
    <title>微信v3的h5支付测试</title>
    <script src="https://cdn.staticfile.org/vue/2.2.2/vue.min.js"></script>
    <script src="https://cdn.staticfile.org/jquery/1.10.2/jquery.min.js"></script>
</head>
<div id="app">
    <h1>微信支付v3的h5支付测试</h1>
    <button @click="h5PayTest()">点击购买</button>
</div>
<body>
<script>
    function httpGet(url, params, back) {
        $.ajax({
            type: 'GET',
            url: url,
            data: params,
            success: function (res) {
                back(res)
            },
            error: function (xhr, textStatus, errorThrown) {
                alert(errorThrown)
            }
        })
    }
    new Vue({
        el:'#app',
        data(){
            return {}
        },
        methods:{
            h5PayTest(){
                httpGet('/v3/h5Pay',{},res=>{
                    debugger
                    alert(res.data)
                    let data = JSON.parse(res.data)
                    location.href = data['h5_url']
                })
            }
        },
        mounted(){

        }
    })
</script>
</body>
</html>
知道你们懒,直连商户的h5支付接口代码也贴在这里了
    //h5支付 直连商户模式
    @RequestMapping("/h5Pay")
    @ResponseBody
    public ResponseInfo h5Pay(HttpServletRequest request) {
        try {
            String timeExpire = DateTimeZoneUtil.dateToTimeZone(System.currentTimeMillis() + 1000 * 60 * 3);
            H5Info h5Info = new H5Info()
                    .setType("Wap");//场景类型示例值:iOS, Android, Wap
            SceneInfo sceneInfo = new SceneInfo()
                    .setPayer_client_ip(CommonUtil.getIpAddress(request))//调用微信支付API的机器IP,支持IPv4和IPv6两种格式的IP地址。
                    .setH5_info(h5Info);
            UnifiedOrderModel unifiedOrderModel = new UnifiedOrderModel()
                    .setAppid(wxPayV3Bean.getAppId())//公众号ID
                    .setMchid(wxPayV3Bean.getMchId())//直连商户号
                    .setDescription("IJPay 让支付触手可及")//商品描述
                    .setOut_trade_no(PayKit.generateStr())//商户订单号
                    .setTime_expire(timeExpire)//订单失效时间
                    .setAttach("微信系开发脚手架 https://gitee.com/javen205/TNWX")//附加数据,在查询API和支付通知中原样返回,可作为自定义参数使用
                    .setNotify_url(wxPayV3Bean.getDomain().concat("/v3/payNotify"))//通知地址
                    .setAmount(new Amount().setTotal(1))//订单总金额,单位为分。
                    .setScene_info(sceneInfo);//支付场景描述

            log.info("统一下单参数 {}", JSONUtil.toJsonStr(unifiedOrderModel));
            IJPayHttpResponse response = WxPayApi.v3(
                    RequestMethod.POST,
                    WxDomain.CHINA.toString(),
                    WxApiType.H5_PAY.toString(),
                    wxPayV3Bean.getMchId(),
                    getSerialNumber(),
                    null,
                    wxPayV3Bean.getKeyPath(),
                    JSONUtil.toJsonStr(unifiedOrderModel)
            );
            log.info("统一下单响应 {}", response);
            // 根据证书序列号查询对应的证书来验证签名结果
            boolean verifySignature = WxPayKit.verifySignature(response, wxPayV3Bean.getPlatformCertPath());
            log.info("verifySignature: {}", verifySignature);
            return new ResponseInfo(response.getBody());
        } catch (Exception e) {
            e.printStackTrace();
        }
        return new ResponseInfo(500,"null",null);
    }
commonUtil.java
import javax.servlet.http.HttpServletRequest;

/**
 * @ClassName commonUtil
 * @Description TODO
 * @Author ZhangYong
 * @Date 2020/11/12 11:14
 * @Version 1.0
 **/
public class CommonUtil {
    public static String getIpAddress(HttpServletRequest request) {
        String Xip = request.getHeader("X-Real-IP");
        String XFor = request.getHeader("X-Forwarded-For");
        if(StringUtils.isNotEmpty(XFor) && !"unKnown".equalsIgnoreCase(XFor)){
            //多次反向代理后会有多个ip值,第一个ip才是真实ip
            int index = XFor.indexOf(",");
            if(index != -1){
                return XFor.substring(0,index);
            }else{
                return XFor;
            }
        }
        XFor = Xip;
        if(StringUtils.isNotEmpty(XFor) && !"unKnown".equalsIgnoreCase(XFor)){
            return XFor;
        }
        if (StringUtils.isBlank(XFor) || "unknown".equalsIgnoreCase(XFor)) {
            XFor = request.getHeader("Proxy-Client-IP");
        }
        if (StringUtils.isBlank(XFor) || "unknown".equalsIgnoreCase(XFor)) {
            XFor = request.getHeader("WL-Proxy-Client-IP");
        }
        if (StringUtils.isBlank(XFor) || "unknown".equalsIgnoreCase(XFor)) {
            XFor = request.getHeader("HTTP_CLIENT_IP");
        }
        if (StringUtils.isBlank(XFor) || "unknown".equalsIgnoreCase(XFor)) {
            XFor = request.getHeader("HTTP_X_FORWARDED_FOR");
        }
        if (StringUtils.isBlank(XFor) || "unknown".equalsIgnoreCase(XFor)) {
            XFor = request.getRemoteAddr();
        }
        System.out.println(XFor);
        return XFor;
    }
}
h5支付比较简单,后续是退订,有点小坑
退订对接(通用)
ps:前面说了,v2和v3都是用的v2的退订api,iJpay代码中v3没有提供退订的代码,需要自己根据v2的代码,仿写一个.
提前把仿写的坑说了:
算了懒得说,我直接吧我的代码贴出来吧,v2和v3的代码逻辑差别有点大,毕竟不是同时写的.
大概流程:
前端输入订单号,发起退订请求–>响应结果–>完事儿
WxPayRefundController.java
package com.example.wxpay.controller.wxpay;

import com.example.wxpay.domain.WxPayV3Bean;

import com.ijpay.core.enums.SignType;

import com.ijpay.core.kit.HttpKit;

import com.ijpay.core.kit.WxPayKit;

import com.ijpay.wxpay.WxPayApi;

import com.ijpay.wxpay.model.RefundModel;

import com.ijpay.wxpay.model.RefundQueryModel;

import org.apache.commons.lang3.StringUtils;

import org.slf4j.Logger;

import org.slf4j.LoggerFactory;

import org.springframework.stereotype.Controller;

import org.springframework.web.bind.annotation.RequestMapping;

import org.springframework.web.bind.annotation.RequestMethod;

import org.springframework.web.bind.annotation.RequestParam;

import org.springframework.web.bind.annotation.ResponseBody;


import javax.annotation.Resource;

import javax.servlet.http.HttpServletRequest;

import java.util.HashMap;

import java.util.Map;


/**

 * @ClassName WxPayRefundController

 * 微信支付v2/v3 通用退订接口

 * @Author ZhangYong

 * @Date 2020/11/12 14:46

 * @Version 1.0

 **/

@Controller

@RequestMapping("/wxCommon")

public class WxPayRefundController{


    private static final Logger log = LoggerFactory.getLogger(WxPayV3Controller.class);


    @Resource

    WxPayV3Bean wxPayV3Bean;


    /**

     * 微信退款

     */

    @RequestMapping(value = "/refund", method = {RequestMethod.POST, RequestMethod.GET})

    @ResponseBody

    public String refund(@RequestParam(value = "transactionId", required = false) String transactionId,

                         @RequestParam(value = "outTradeNo", required = false) String outTradeNo) {

        try {

            log.info("transactionId: {} outTradeNo:{}", transactionId, outTradeNo);


            if (StringUtils.isBlank(outTradeNo) && StringUtils.isBlank(transactionId)) {

                return "transactionId、out_trade_no二选一";

            }


            Map<String, String> params = RefundModel.builder()

                    .appid(wxPayV3Bean.getAppId())

                    .mch_id(wxPayV3Bean.getMchId())

                    .nonce_str(WxPayKit.generateStr())

                    .transaction_id(transactionId)

                    .out_trade_no(outTradeNo)

                    .out_refund_no(WxPayKit.generateStr())

                    .total_fee("1")

                    .refund_fee("1")

                    .notify_url(wxPayV3Bean.getDomain().concat("/wxCommon/refundNotify"))

                    .build()

                    .createSign(wxPayV3Bean.getApiKey(), SignType.MD5);

            String refundStr = WxPayApi.orderRefund(false, params, wxPayV3Bean.getCertP12Path(), wxPayV3Bean.getMchId());

            log.info("refundStr: {}", refundStr);

            return refundStr;

        } catch (Exception e) {

            e.printStackTrace();

        }

        return null;

    }


    /**

     * 微信退款查询

     */

    @RequestMapping(value = "/refundQuery", method = {RequestMethod.POST, RequestMethod.GET})

    @ResponseBody

    public String refundQuery(@RequestParam(required = false) String transactionId,//微信订单号

                              @RequestParam(required = false) String outTradeNo,//商户订单号

                              @RequestParam(required = false) String outRefundNo,//商户退款单号

                              @RequestParam(required = false) String refundId) {//微信退款单号

        if (StringUtils.isBlank(transactionId) && StringUtils.isBlank(outTradeNo)&&StringUtils.isBlank(outRefundNo) && StringUtils.isBlank(refundId)) {

            return "transactionId,outTradeNo,outRefundNo,refundId四选一";

        }

        Map<String, String> params = RefundQueryModel.builder()

                .appid(wxPayV3Bean.getAppId())

                .mch_id(wxPayV3Bean.getMchId())

                .nonce_str(WxPayKit.generateStr())

                .transaction_id(transactionId)

                .out_trade_no(outTradeNo)

                .out_refund_no(outRefundNo)

                .refund_id(refundId)

                .build()

                .createSign(wxPayV3Bean.getApiKey(), SignType.MD5);


        return WxPayApi.orderRefundQuery(false, params);

    }


    /**

     * 退款通知

     */

    @RequestMapping(value = "/refundNotify", method = {RequestMethod.POST, RequestMethod.GET})

    @ResponseBody

    public String refundNotify(HttpServletRequest request) {

        String xmlMsg = HttpKit.readData(request);

        log.info("退款通知=" + xmlMsg);

        Map<String, String> params = WxPayKit.xmlToMap(xmlMsg);


        String returnCode = params.get("return_code");

        // 注意重复通知的情况,同一订单号可能收到多次通知,请注意一定先判断订单状态

        if (WxPayKit.codeIsOk(returnCode)) {

            String reqInfo = params.get("req_info");

            String decryptData = WxPayKit.decryptData(reqInfo, wxPayV3Bean.getApiKey());

            log.info("退款通知解密后的数据=" + decryptData);

            // 更新订单信息

            // 发送通知等

            Map<String, String> xml = new HashMap<String, String>(2);

            xml.put("return_code", "SUCCESS");

            xml.put("return_msg", "OK");

            return WxPayKit.toXml(xml);

        }

        return null;

    }

}
通用发起退订.html
<!DOCTYPE html>
<html>
<head>
    <meta charset="UTF-8">
    <title>通用发起退订</title>
    <script src="./js/jquery-3.3.1.min.js"></script>
    <script src="./js/vue.min.js"></script>
    <script src="./js/http.js"></script>
</head>
<body>
<div id="app">
    <h1>通用发起退订</h1>
    <input v-model="refundOrderCode">
    <button @click="refundOrderHandle()">退订</button>
    <h1>通用退款查询</h1>
    <input v-model="queryOrderCode">
    <select v-model="queryType">
        <option value="transactionId">微信订单号</option>
        <option value="outTradeNo">商户订单号</option>
        <option value="outRefundNo">商户退款单号</option>
        <option value="refundId">微信退款单号</option>
    </select>
    <button @click="queryOrderHandle()">查询</button>
</div>
<script>
    new Vue({
        el:'#app',
        data(){
            return {
                refundOrderCode:'',//退订订单号
                queryOrderCode:'',//查询编号
                queryType:''//查询编号类型
            }
        },
        methods:{
            refundOrderHandle(){
                if (!this.refundOrderCode){
                    alert('订单号不能为空')
                    return false
                }
                let data = {outTradeNo:this.refundOrderCode}
                http.get('/wxCommon/refund',data,res=>{
                    console.log(res)
                })
            },
            queryOrderHandle(){
                if (!this.queryOrderCode){
                    alert('查询编号不能为空')
                    return false
                }
                if (!this.queryType){
                    alert('查询编号类型不能为空')
                    return false
                }
                let data = {}
                data[this.queryType] = this.queryOrderCode
                http.get('/wxCommon/refundQuery',data,res=>{
                    console.log(res)
                })
            }
        },
        mounted() {

        }
    })
</script>
</body>
</html>
ps:以上皆为自己的对接经验,有理解的不够深刻的地方,多多包涵.如果博客还有不详细或者错误的地方,欢迎评论告诉我
差不多常用的微信支付对接就可以了,不懂的欢迎评论留言,写博客不易,觉得不错的老铁点赞关注收藏一波,谢谢!
后续我会再发公众号对接和支付宝支付的对接的博客.
————————————————
版权声明:本文为CSDN博主「绅士1993」的原创文章,遵循CC 4.0 BY-SA版权协议,转载请附上原文出处链接及本声明。
原文链接:https://blog.csdn.net/aitanxiaofeng/article/details/109612645
本文为转载文章,版权归原作者所有,不代表本站立场和观点。